Wednesday, November 9, 2011

XXXIX


After a relatively warm December, January has shown that winter is indeed here. Nothing brings on warmth and comfort like the aroma of gingerbread. More importantly, its spicy scent covers the smell of roasted chicken, which is especially good when you live in a super tiny apartment that is wreaking of smoke (if you have ever used Zuni's recipe then you know exactly what I'm talking about).


As the frosty weather continues on and my comfort food cooking cravings intensify, more homey and comforting goods will be baked. Thank you, gingerbread, for making the cold nights more bearable and thank you for being the perfect thing to make one's apartment smell less poultry-like!


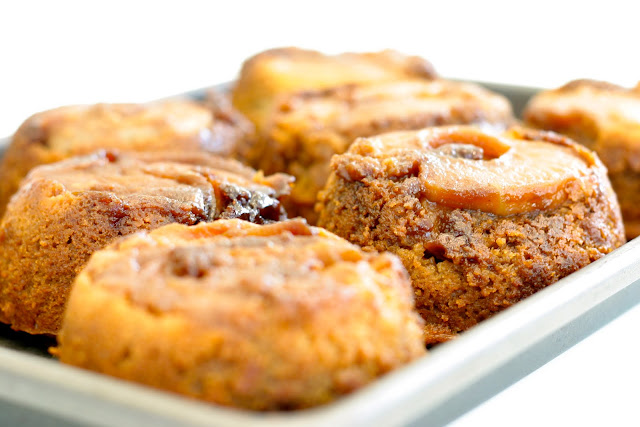
Gingerbread Apple Upside-Down Cake
Adapted from
Smitten Kitchen via Karen Bates at the Philo Apple Farm via the New York Times

Serves 12

Topping
4 tablespoons butter, plus extra for greasing pan
1/2 cup dark brown sugar
Pinch of salt
4 apples (about 1 3/4 pounds), peeled, cored and cut into 1/4-inch wedges

Batter
1/2 cup (1 stick or 4 ounces) butter, at room temperature
1/2 cup sugar
1 large egg
1/3 cup dark molasses
1/3 cup honey
1 cup buttermilk
2 1/4 cups flour
1 teaspoon baking soda
1/2 teaspoon salt
1 teaspoon ground ginger
1 teaspoon cinnamon

Very softly whipped cream

Make the topping: Preheat the oven to 325°F. Grease a 10-inch cake pan. Melt butter in a small saucepan. Add brown sugar and simmer over moderate heat, stirring, four minutes, then swirl in salt. Remove from heat and pour into the bottom of your cake pan. Make circles of overlapping apple slices on top of the caramel. Chop any remaining slices and place them in the gaps.

Make the batter: Using a mixer, blend 1/2 cup butter and the sugar on medium-low speed. Increase the speed to high and cream until light and fluffy.

In a medium bowl, whisk together the egg, molasses, honey and buttermilk. In a separate bowl, sift together the flour, baking soda, salt, ginger and cinnamon. Alternate mixing the flour and molasses mixtures into the butter mixture, adding the next once the last has been incorporated.

Pour the batter into the pan. Bake at least 45 to 50 minutes (thanks to commenter klp for reminding me this took a bit longer) or until a wooden tester inserted into the center of the cake comes out clean. Let cool on a rack for 10 to 15 minutes, then turn out onto a platter (one that will catch spills, unlike what you see in the pictures above).

Serve warm or cool with very softly whipped cream.
Monday, November 7, 2011

XXXVIII


During the week, my meals are usually healthy. I keep carbs to a minimum, rarely eat dessert, watch my portions, limit the number of times I go out to eat, and make healthy vegetable omelets in the morning. For the most part, I'm successful at eating this way but there are times that I need to partake in birthday celebrations during the week and then these dietary habits go out the window. This is how I like to think of it:

"Calories don’t count if they’re connected to a celebration. Everyone knows this." -Janet Evanovich, Hard Eight

My coworker, Emily, requested coffee cake for her birthday and though I have not made it in years, it once was my go to cake in middle school. I was obsessed with making coffee cake because the only other option in my repertoire was a yellow cake from the box. Baking with boxed cake mix is never fun regardless of your age.


Coffee cakes can end up dry. dense and bland but Ina Garten's recipe produced a moist, fluffy, cinnamony, comforting cake. She isn't Paula Deen but she sure does love her butter. After taking a bite, Emily asked how many sticks of butter were in the cake and that was the first thing my mom commented on as well when I made Ina's Blueberry Crumb Cake for her. I know there can never really be too much butter but I would have liked the coffee cake to have had less of a pound cake flavor. It was delicious nonetheless and Ina never steers me wrong. The coffee cake is perfect with a morning coffee or as an afternoon snack but I had it for both since it's a celebratory cake and obviously, the calories don't count!

Close up of my favorite part - the streusel!

Sour Cream Coffee Cake

2001, Barefoot Contessa Parties, Serves: 8 to 10 servings

• 12 tablespoons (1 1/2 sticks) unsalted butter at room temperature
• 1 1/2 cups granulated sugar
• 3 extra-large eggs at room temperature
• 1 1/2 teaspoons pure vanilla extract
• 1 1/4 cups sour cream
• 2 1/2 cups cake flour (not self-rising)
• 2 teaspoons baking powder
• 1/2 teaspoon baking soda
• 1/2 teaspoon kosher salt

For the streusel: (I doubled the streusel)
• 1/4 cup light brown sugar, packed
• 1/2 cup all-purpose flour
• 1 1/2 teaspoons ground cinnamon
• 1/4 teaspoon kosher salt
• 3 tablespoons cold unsalted butter, cut into pieces
• 3/4 cup chopped walnuts, optional

For the glaze: (I used 1 tbps. melted butter, 1/2 cup powdered sugar, and 2 tbps. whole milk)
• 1/2 cup confectioners' sugar
• 2 tablespoons real maple syrup

Preheat the oven to 350 degrees F. Grease and flour a 10-inch tube pan.

Cream the butter and sugar in the bowl of an electric mixer fitted with the paddle attachment for 4 to 5 minutes, until light. Add the eggs 1 at a time, then add the vanilla and sour cream. In a separate bowl, sift together the flour, baking powder, baking soda, and salt. With the mixer on low, add the flour mixture to the batter until just combined. Finish stirring with a spatula.

For the streusel, place the brown sugar, flour, cinnamon, salt, and butter in a bowl and pinch together with your fingers until it forms a crumble. Mix in the walnuts, if desired.

Spoon half the batter into the pan and spread it out with a knife. Sprinkle with 3/4 cup streusel. Spoon the rest of the batter in the pan, spread it out, and scatter the remaining streusel on top. Bake for 50 minutes.

Let cool on a wire rack for at least 30 minutes. Carefully transfer the cake, streusel side up, onto a serving plate. Whisk the confectioners' sugar and maple syrup together, adding a few drops of water if necessary, to make the glaze runny. Drizzle as much as you like over the cake with a fork or spoon.

Friday, October 14, 2011

XXXVII


I have only been at work for one week in the past three and a half weeks. To be fair, I was in London on holiday for one week, went to work the following week and then came down with the flu, pink eye in both eyes and a corneal infection. To thank my coworkers for taking care of the things I normally do (and to ensure that they wouldn't hate me for being absent during two of the busiest weeks of the month), I made them banana bread.


Banana bread is on my top five favorite baked goods list. When it's done properly, it yields a loaf that is moist and not too dense. I haven't found a recipe that I can use as my go to. Like everything else I bake, I am always on the search for the perfect recipe. When something falls in my "favorites" category, such as red velvet cake, pancakes, and biscuits, I grade recipes and make many notes. How else am I going to know if the recipe is the ultimate? I also do this when I become addicted to something that I have to buy to eat like banh mi sandwiches (Hanco's in Brooklyn tops the list), chocolate chip cookies and macarons. The notebook comes out and a detailed grading system gets established. Very nerdy of me, I'm aware.


I know that a recipe can have no less than three bananas because I want the full banana flavor and the higher number of bananas lends to a moister loaf. The recipe I settled on called for six bananas so I had high hopes that the bread would be the be all and end all of banana bread recipes but alas, that was not the case. The banana bread lacked depth and I should have known that would be the case given the short list of ingredients. I'm not going to include the recipe because I don't think it's worth making. The search for the perfect banana bread continues on... though, let's hope that it is under better circumstances the next time I bake banana bread!

Saturday, February 26, 2011

XXXVI

Salted


Caramel


I would love to say that my first foray into making caramel was successful but alas, that was not the case. It is fairly simple to make as long as you follow the one cardinal rule: never, under any circumstance, take your eye off of it. I underestimated how long it would take for the sugar to caramelize and I grew impatient as it seemed like it was taking forever for the sugar mixture to change color. Cardinal rules are there for a reason and my need to multitask got the best of me. I turned around to look for a glass jar and shortly after, I smelled something burning. Just like that, my caramel quickly went from not being ready to being slightly burnt. However, I was determined to not put it to waste. After all, it wasn't horribly burned... it was just slightly bitter with a deeper caramel flavor that what I had originally desired.

I salvaged the caramel by pouring it into a gelato base where the milk and heavy cream worked beautifully together to lessen the burnt notes. The Kitchn had a post with recommendations from Mario Batali for making homemade gelato. I used two of the three which were to use whole milk and to underchurn the base since gelato is more dense than ice cream. Churning it for too long would result in airy gelato, which is not what it should be.

Of course, if there is a way to add decadence to a dessert, I am the all about it. Salted caramel poured over burnt caramel gelato? Yes, please!


Gelato
Adapted from
Allrecipes

Ingredients:
2 cups milk
1 cup heavy cream 4 egg yolks
1/2 cup sugar

Directions:

1. In a medium saucepan, mix milk and cream. Warm until foam forms around the edges. Remove from heat.

2. In a large bowl, beat the egg yolks and sugar until frothy. Gradually pour the warm milk into the egg yolks, whisking constantly. Return mixture to saucepan; cook over medium heat, stirring with a wooden spoon until the mixture gels slightly and coats the back of the spoon. If small egg lumps begin to show, remove from heat immediately.

3. Pour the mixture through a sieve or fine strainer into a bowl. Cover, and chill for several hours or overnight.

4. Pour the mixture into an ice cream maker, and freeze according to the manufacturer's instructions. Transfer to a sealed container, and freeze until firm. If the gelato is too firm, place it in the refrigerator until it reaches the desired consistency


Caramel Sauce
Adapted from
Ina Garten

1 1/2 cups sugar
1/3 cup water
1 1/4 to 1 1/2 cups heavy cream
1/2 vanilla bean or 1/2 teaspoon pure vanilla extract

Directions

1. Mix the water and sugar in a large heavy-bottomed saucepan. Cover and cook over low heat until the sugar dissolves. Increase the heat and boil uncovered until the sugar turns a medium brown, about 5 to 7 minutes, stirring occasionally with a wooden spoon. Watch it carefully at the end, as it will go from caramel to burnt very quickly.

2. Stand back to avoid splattering, and gradually add the cream and the seeds scraped from the vanilla bean (or vanilla extract). Simmer until the caramel dissolves and the sauce is smooth and thick, about 2 minutes.

3. Serve warm, or add another 1/4 cup of heavy cream and serve room temperature.

Yield: 1 3/4 cups

Monday, February 14, 2011

XXXV

This post is long overdue. I went to Hong Kong and China in July and anyone who has been to Asia knows that you mainly do one thing while you're there - you eat!

Cha siu bao - I ate one every single day...literally. If I didn't have a fresh bao when I went out for breakfast at dim sum, I surely had a defrosted and steamed one for lunch, which was surprisingly just as good.

I'm not too cool to pretend that I'm a martian.


My aunt and uncle in Hong Kong have a standing table for breakfast at the Panda Hotel. They eat there every single day. The food is quite good but I don't know if it is good enough to warrant a daily viewing of the demonic pandas. The one on the left particularly frightens me.


The black squares in the latte are grass jelly, a gelatinous dessert that's popular in China. I was surprised by how busy the Starbucks were given that I barely frequent them myself in order to lower my "latte factor." I thought I'd see fewer people due to the significantly lower cost of living especially since the prices were the same as the U.S.' Please note that those are not my fingernails.


The Chinese love their potatoes...with mayo and corn. I don't get it either.

Oh, Hong Kong....I love you. You, too, China. I will see you both again in a few months!

Tuesday, February 8, 2011

XXXIV


A haiku for my afternoon snack, courtesy of Macaron Cafe.

Passionfruit maccie
Flaky and chewy goodness
Another one, please!

Sunday, February 6, 2011

XXXIII


When I’m bored at work I stuff my face with food. Sheer, utter boredom drives me to eat bowl after bowl of Special K with strawberries. Yes, I am aware that the freeze-dried strawberries resemble astronaut food, that they have a fuzzy, foamy, unnatural texture and an almost acrid, sour flavoring. Every once in awhile though, I get a strawberry that looks like a heart and that just confirms the loving relationship I share with the cereal. Insanity? Perhaps. You try dealing with boredom.

I digress. I am unabashedly addicted to Special K. Portion control? That means limiting myself to just one bowl at a time…until I need to go back for another bowl. I typically eat half a box of Special K per day. This can’t be good for me. I think it's time to put an end to my cereal addiction.


On my quest for a new afternoon snack I tried 'Wichcraft's granola and yogurt. Their granola is delicious but clearly too decadent for an everyday snack and the yogurt is full fat Greek yogurt, which does not bode well with my stomach. My research for granola lead me to New York Time's granola recipe and it was raved upon by many bloggers. I love anything with ginger so when I came across Bitchin' Camero's gingery olive oil granola while looking for different variations on the NYT's recipe, I knew it was the one I needed to make. By using Fage's 0% fat yogurt and this less decadent granola, I ended up with a perfectly sweet, healthy snack.

My body is already thanking me for keeping it void of thousands of calories from cereal. But, from time to time, I do long for my beloved Special K and that brief, joyous moment when I find a heart shaped freeze-dried strawberry.


Gingery Olive Oil Granola
From
Bitchin' Camero, adapted from the New York Times

3 cups rolled oats
1 cup roasted, salted pumpkin seeds
1 cup slivered almonds
1/3 cup olive oil
3/4 cup Grade B Maple Syrup
1/2 cup ginger sugar, or 1/2 cup organic cane sugar and 1/4 tsp. powdered ginger
1 tsp. sea salt
1/2 tsp. cinnamon
1/2 tsp. cardamom
1 cup dried, unsulfured apricots, diced

Preheat the oven to 300°. Mix all the ingredients, except for the apricots, in a large bowl.

Spread the oats onto a rimmed cookie sheet and bake for 45 minutes, stirring every 10 minutes or so. Remove from oven when the oats are crisp and golden.

Toss with the apricots and let cool.

Makes about 8 cups.

Friday, January 28, 2011

XXXII


I've been glued to the TV watching the Australian Open for the last week. I was hoping for a Federer/Nadal showdown because I don't ever get tired of seeing them battle it out on the courts. However, like my friend Dimitris said, it was becoming kind of a status quo so it'll be exciting to see the Murray/Djokovic match. I won't be up to watch the men's or women's final (GO CHINA!) at 3am but I'll be able to catch it when I wake up thanks to the wonderful existence of DVR.

In the meantime, I'm making pavlova to celebrate the finals weekend. Pavlova originated in Australia (or New Zealand depending on who you ask) and I've never actually eaten it before even though I studied abroad in Sydney for half a year. I've had my fair share of Tim Tams and meat pies but I never heard nor seen this popular dessert.


Pavlova is essentially a meringue topped with whipped cream and fruit. It is an easy and fast dessert to make and it requires only a few ingredients. The only time factor is the hour it takes to bake in the oven and the hour it needs to cool down. Pavlovas are the perfect vessel to showcase seasonal fruit. However, we've had heaps and heaps of snow lately so I wanted something more comforting. I'll save the berries for the summer when I should be eating lighter desserts and indulge a bit now!


I was inspired to by one of my favorite blogs, Une-Deux Senses, to top my pavlova with bananas foster. I combined it with homemade whipped cream, which helped cut the sweetness of the bananas and meringue. As you can see from the picture above, the crispy exterior and marshmallowy center make for wonderfully textured filled bites. I now I'll be torn from wanting to devour the whole pavlova with trying to focus on the final but I have a feeling that the pavlova will easily win this match.

Pavlova


For the pavlova:

adapted from Une-Deux Senses

3 egg whites

1/2 cup caster sugar

1/2 tsp. vinegar

1/2 tsp. cornstarch

1/2 tsp. vanilla


Preheat the oven to 250 F and line a baking sheet with parchment paper, set aside. In a stand mixer, whisk the egg whites until soft peaks form. Slowly add the sugar, 1 tbsn. at a time, beating well after each addition. Beat until the mixture is smooth to the touch and their is no graininess. Fold in the cornstarch, vinegar and vanilla. Pour mixture onto your prepared baking sheet and form into a round (of four mini ones, if you want), creating a shallow depression in the center of each. Bake for 1 hour and 15 minutes or until the pavlova is cream colored and the surface is dry and crisp. Turn off the oven and leave the oven door ajar. Allow the pavlovas to cool in the oven until they can be handled.

For the whipped cream: adapted from All Recipes
1/2 cup heavy cream
1/2 tsp vanilla extract
1 tbsp sugar

In a large bowl, whip cream until stiff peaks are just about to form. Beat in vanilla and sugar until peaks form. Make sure not to over-beat, cream will then become lumpy and butter-like.

For the bananas foster:
3 tbsp butter
1/2 cup dark brown sugar
1 tbsp rum
3/4 tsp vanilla extract
1/4 tsp cinnamon
2 bananas, sliced

Melt butter over medium heat in a large skillet. Once it starts bubbling, add the brown sugar, rum, vanilla and cinnamon. When the mixture is combined well and the brown sugar has dissolved, place the bananas in the skillet. Cook for 2-4 minutes.